Tuesday, December 16, 2014

Montage


For this assignment I created a montage. A montage is like a collage and for this montage, it is the alphabet in sign-language. I got multiple people to sign each letter of the alphabet and I arranged it in order of the alphabet. I took individual photos and digitally put them together on an editing app, Gimp. I always increased the brightness and contrast just a bit to get the detail out from the photographs.

Final Sign-Language Montage


Tuesday, December 9, 2014

Advertisment


For this post I created an advertisement for an imaginary jewelry company. The assignment was to create an ad. that had a photo as well as text to show what your selling. In making the photo the photo was taken in color but as you can see the color is not in color. I changed it to black and white and changed the saturation and hue to give this color. I thought the color would give it an official and royal feel to it and reflect the silver color of it.


Objects


This post is about objects. I took pictures of objects with a plain background. The objective of this assignment was to just take good quality images of objects with just plain backgrounds so that the object would stand out. The object not only had to be a plain color but also had to have some contrast between the background and then object so the color would not blend. During editing I mostly increased the brightness and contrast so the background would have more contrast against the object. I wanted to also show the detail in the object itself and tired to bring out the shadows in the background.

Object 1


 Object 2


Monday, December 8, 2014

Alfred Stieglitz


For these blog I researched a well known photography named Alfred Stieglitz who is said to be on of the most important contributors to the history of photography. He was born to Jewish Immigrants and the eldest of 6 children. In early 1890s he moved to Berlin and went to a technical high school in Berlin as a student of mechanical engineering (Technische Houchschule) where he was first exposed to photography while taking a photography course.   From then on involved with photography, first as a technical and scientific challenge and later an artistic one. He then came back to America where he wrote a lot about photography with various magazines like Camera Work. While his work as a photographer he said “My aim is increasingly to make my photographs look so much like photographs that unless one has eyes and sees, they won’t be seen – and still everyone will never forget having once looked at them.” I take this as he was someone who wanted his work to be remembered. After his travel from Europe he came back and introduced modern art to America and developed the idea of photography being a part of art. He was such an artist that he refused to do anything else but a photographer in life. The type of photography he takes was part of modernism: philosophical movement that came from transformations in the western world in the 19th and 20th century with the aim to break the traditional forms.


The bottom three photos are photos that show modernism, they show the transformations in the world from first using carriages and horses, then to ferry boats, then airplanes. The airplane one is my favorite  because the main subject is so small and deson't even take up a third of the space yet it is signifcant. I also really like it because it looks as if the plane is flying off the photo in a diagonal motion which I liked a lot.


Tuesday, November 11, 2014

Sequence


This post is all about sequence photos. Sequence are literally a sequence of photos telling a story, like a comic book but photographs. This sequence photo is about a girl who starts out sad but ends up happy. Sequence photos take thought because you have to think about what you're going to show.

Dyptic


Dyptic photos are two photos put together that have some relation. This picture is a dyptic photo because it is a picture with 2 different photographs that are put together with some kind of relation. This photo has a photo of a flower and a tree, they are both part of nature and grow. Flowers and trees are both part of nature giving it a relation. I took these photos with no special specifications and the only editing that was done was the contrast and brightness to focus on he photos more.

Filter Use


Original Photo

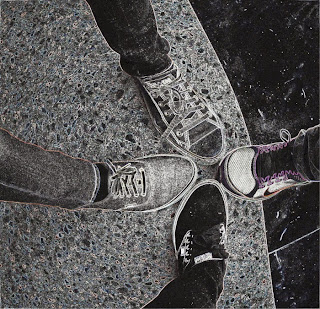
This post is about me using different filters, I took a photo of a simple photo of 4 different people and their shoes, (including mine). I took it with the setting of fish eye on the camera. Then I edited in 6 different ways with 6 different filters. I used the following filters; sharpen, cartoon, sepia, mosaic, edge, & cubism. The original is above and the filtered photos are below.

Sharpen


 Sepia


Mosaic


Edge


Cubism


Masks

In photography we made masks which specifications. The mouth had to be open so the person who was in the photo could make an expression with their mouth and set a mood for the photo. I made a bunny mask and this mask was used in several pictures

Mask in Sepia Tone


The aim of this photo was to take a picture of someone wearing the mask in a natural environment. I got the person to stand in between branches of a small tree to appear as if the bunny was popping out. This picture was taken in sepia tone, it was not edited to be sepia. The setting on the camera was sepia for the color, and for the size of the picture it was a 1:1 ratio so get a square shape.

Mask With Hat Black and White

This photo had a different aim than the one above. The aim was to take a picture of someone wearing my mask in a plain background with a prop, a hat. It was a cowboy hat and with this hat the position of the person related to the hat. I see it as a bunny cowboy. The settings on the camera were changed to take a picture in black and white which was done. Then edited to have more focus on the person, I added more contrast to her to make her more visible and clearer for the audience.


Mask With Hat Color
 This photo was also taken with the hat but unlike the one above it was taken in color. The settings on the camera was set to color so I could get all the different colors in. Again I had a plain background in the photo to emphasize and have more focus on the main subject of the photo. This photo was edited also so the audience could see the colors more and in this way the colors were able to pop at. I had contrasted it for more colors.

Mask Without Hat in Black & White
The aim of this photo was to take a photo of someone wearing my mask in a natural environment. I got the person wearig the mask to stand in between a V-shaped opening of a tree and act as if the bunny is pocking it's head out. This picture was taken in black and white by changing the color setting on the camera.

Mask Without Hat Color
 This photo had a similar aim to the one above which was to take a photo with someone wearing my mask in a natural environment. It's in an area where it's all green and got my person to pick up a flower and ask as if it would eat it, playing a role as a bunny rabbit. This picture is in color and was taken in it by changing the setting on the camera, and was only edited to bring up the contrast a bit more.

Monday, September 29, 2014

Texture


For this assignment we had to take pictures with texture. This means it has a certain feel to it.


Texture Photograph 1


This picture has a texture that's kind of rough. It's almost as if you can see how it feels. The angle was straight so the image focused on the texture of that streak that's in the middle of the tree bark.


Texture Photograph 2


This photo was similarly taken of a tree like the photo above, however it is a different tree and the angle of how the photo was taken is different. It was taken from below and and angled to the top.


Texture Photograph 3


This photo was taken of the cap of a sewer opening. The angle makes it look like it has depth, it looks like it is continuing to the top. I edited so that the contrast and brightness would look unique as well as abstract, the colors have silver as well as other colors involved. The texture involves the actual squares as well as the ground next to the squares.


Texture Photograph 4


This photo was taken of a wall outside, you can see the texture of the wall with the lines on the wall. You can see the texture which is rough. You can see a small angle as it goes up to the right corner.


Texture Photograph 5


This photo was captured to show the texture of the leaves. The lines on the leaves show the texture of the leaves.


Texture Photograph 6


This photo was taken of a roof which has many different textures. It captures just the important aspects of the photo and this could be anything because of the pattern, the texture, and the subject of the photo.

Macro Photography


For this assignment I was to take 2 macro photographs. Macro photos are pictures that are focused on something small and the detail on that some object is present. On most cameras there is a setting called macro which helps zoom in and focus on tiny details and this setting was used for these photographs below. Cameras have a setting called macro. The setting helps the details in small objects more visible and focus on the tiny details. The macro setting was used and turned on during the taking of these pictures.

Color Macro Photograph


This macro photo is a picture of my braids on a surface. The color of the background was edited to have a bit more contrast between the braids and the table. The macro setting was used to capture the smallest detail in the detail.


Black & White Macro Photograph


This macro photo is a picture of a ring. I chose black and white because of the color of the ring. The ring is silver and when the color of the photo is black and white I really liked the blend of the grey and silver as it's a good combination. To capture the really small bits of detail I used the macro setting  on the camera.

Blurry Photography


For this assignment I was to taken a blurry photo and to take a photo that was not blurry and to make it blurry.

Blurry Taken Photo

This picture was taken as a blurry photo and edited to give more contrast and the brightness of the colors it has right now. It was taken in color and remained in color during editing. To get the blurry effect I got my friend to spin around a pole and I took continuous shots. I then chose the best one that was blurry. To make sure it would be blurry and not clear like the stop action I made the ISO speed really low to 100.


Photo Edited to Appear Blurry

This picture was originally a still taken photo and I had edited this picture to seem blurry. I used a technique similar to the ones used in stop action. The ISO speed set to 3200 so the picture wouldn't be blurry and in color. I then edited so that it would be blurry.

StopAction Photography


This assignment involved taking stop action photography. Stop Action is when you take a photo that captures a moment in time in the middle of some action. The requirements of this assignment were only to take 2 photos and my final ones are below. In order to take good and clear stop action photography setting the ISO speed higher to what it normally is helps you get a good clear picture with fast movement. With this setting on the camera I was able to take good clear pictures of action. For these pictures the ISO speed to on 3200.

StopAction, Color

This picture was taken to capture the moment of a person swinging from a pole. I took this picture in color and had an ISO speed of 3200 to have a clear stop action photo.

StopAction with Sepia Color


This picture was taken to capture the moment of person doing a cartwheel. This picture was originally taken in color with an ISO speed of 3200 but during edited I decided to change the color to sepia.


Portraits


This was the first assignment of the semester and what was required of us was to take 4 portraits of our classmates. 1 must but sepia, 1 must be color, and 2 must be black and white. Along with this 1 of the photos had to be a close-up, a partial, an angle photo, and a full photograph. In order to get the different colors I had different settings for color for each of the photographs.

Sepia Close-Up

This portrait is a close-up meaning in zooms in on a certain aspect of the face and in this case are the eyes.  I changed the setting on the camera to sepia to get the sepia color look.


Black & White Partial

This picture is also a portrait but was taken in black and white. To get black and white I changed the setting on the camera. This picture only has a partial of the her face. I edited this photo to add more contrast meaning the colors were contrasting more so you can see things more clearly, you can clearly see the difference from the face and the hair.


Color Angle Photograph


This photograph was taken so that it would be in color and has an angle to it, I did not change any settings on the camera because on the normal settings the camera shows color. An angle photograph means the way you see the photograph and how it was taken was not parallel to you eye sight but has a certain angle. Angle photographs can have some of the face or the whole face, in this picture you can see the whole face but that's not the focus of this photo. The focus is the angle.


Black & White Full 

Now a full portrait means it is the full and the whole of the face like this picture. You can see the entire face unlike a partial or a close-up. This picture was taken with the setting of black and white on the camera with the whole of the face, or full face.